


Measure with Standard Units: Long Lengths
Est. Class Sessions: 1–2
Students measure longer lengths using standard units: yards, feet, centimeters, and meters. They compare measurements to examine the relationship between the size of a unit and the number of units in a measure.
Content in this Lesson
- Using words and symbols (e.g., <, >, =) to show comparisons of quantities (e.g., lengths) [E1].
- Using and applying place value concepts and comparative language to compare and order lengths (e.g., shorter, longer, shortest, longest) [E2].
- Solving word problems (e.g., compare) involving length [E3].
- Recognizing that the measure of a length is dependent on the size of the unit of measure (e.g., a pencil is 6 inches or 15 centimeters) [E4].
- Estimating length using standard units (e.g., centimeters, meters, inches, feet, yards) [E5].
- Measuring length using standard units (e.g., centimeters, meters, inches, feet, yards) [E6].
- Selecting and using appropriate units (e.g., centimeters, meters, yards, inches, feet) to measure length [E7].
- Using labels to show what numbers mean [MPE6].

Materials for Students
| Daily Practice and Problems | Lesson | Homework | Assessment | ||
|---|---|---|---|---|---|
Student Book |
Student Activity Book |
|
|
|
|
Teacher Resources |
Teacher Guide - digital |
|
|
Supplies for Student Groups
2 12-inch rulers
2 yardsticks
2 metersticks marked in centimeters
Materials for the Teacher
Display of Going the Distance: Feet and Yards (Student Activity Book) Page 189
Display of Going the Distance: Meters and Centimeters (Student Activity Book) Page 191
Unit 4 Assessment Record
masking tape
2 Apatosaurus footprints from Lesson 1
Measurement Advice Chart from Lesson 1 and Lesson 2
"How Long" display chart from Lesson 2
sidewalk chalk, string, or adding machine tape, optional
index cards, optional
various units and tools to measure length (e.g., ruler, palms, footprints), optional
Materials Preparation
Gather Rulers. Students will need a ruler calibrated in centimeters and a ruler calibrated in inches. These rulers often come together. One side of the ruler is 12-inch ruler and other side is a 30-centimeter ruler. Students will also need a yardstick and a meterstick. A meterstick often has inches on the reverse side. If you do not have yardsticks, place a piece of tape after 36 inches on the meterstick to show students a yardstick. Write "yard" on the tape.
Make a "How Long" Display. If you did not do so in Lesson 2, identify a display space that is large enough to collect a few examples of distances that measure 1 inch, 1 centimeter, 1 meter, 1 yard, and 1 foot. Title the display "How Long." Draw a heavy line with end points that shows each unit of measure. Leave enough room around each unit to collect the names of and examples of distances that measure each unit. Gather one or two examples of distances or objects that measure about 1 yard to add to the display.
Create Lines on the Floor. If you did not do so in Lesson 1, identify a location to place six lines of different lengths. Each line should be straight and there should be space between the lines so that students can work. Use masking tape to make each line and identify each with a letter. See Figure 1. Line F should be 6 meters but should be organized into a zigzag shape with four 2-meter sections.
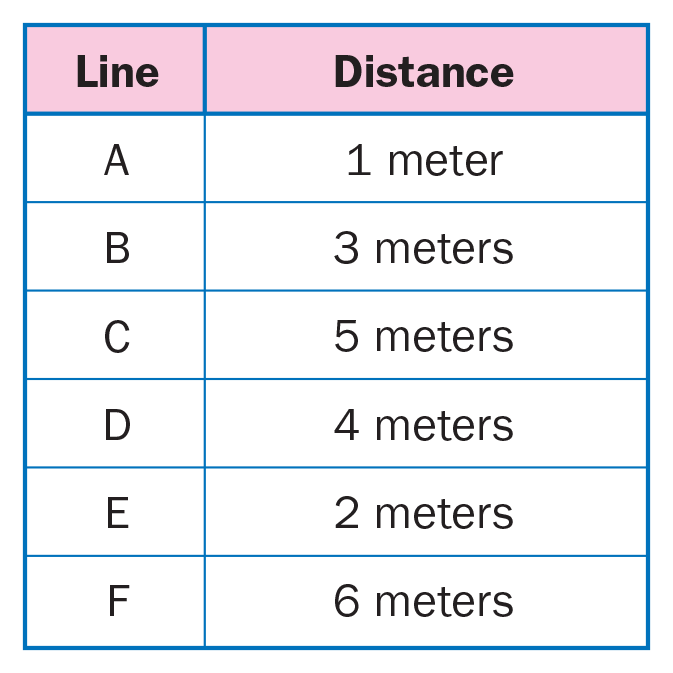
Figure 1: Descriptions of lines
TIMS Tip
Tape can be left for a few days, is durable, and does not move. If you cannot leave the tape on the floor for a few days, you may want to try some of these alternatives: chalk, string, or strips of adding machine tape.
Choose and Measure Activity as Optional Targeted Practice. Choose about 10 distances that students can measure (e.g., length of a stapler, pencil, the desk). Record each distance on a different index card. Provide students with a collection of units (e.g., palms, gorilla palms, footprints, elephant footprints, inches, centimeters, meters, yards). Place the cards and the measurement tools in a learning center. Ask students to choose a distance and then choose a unit to measure that distance. Students can then record the distance on the back of the index card with the unit and their initials.
Assessment in this Lesson
| Assessment | Expectation Assessed | Math Practices Expectation Assessed |
|---|---|---|
|
Going the Distance: Meters and Centimeters with Feedback Box Student Activity Book Pages 191–192 |
|
|
|
Measure Up with Feedback Box Student Activity Book Pages 193–194 |
|
|