Lesson 3

How Much Area

Est. Class Sessions: 1

Developing the Lesson

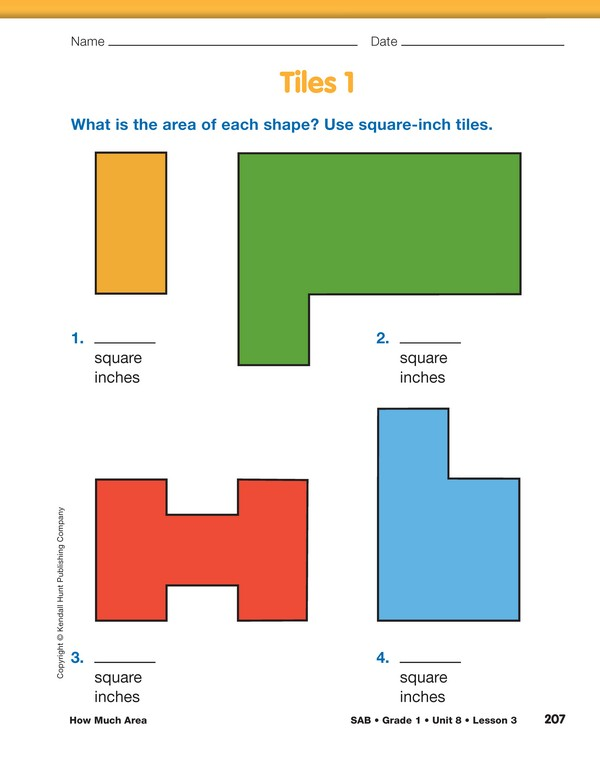
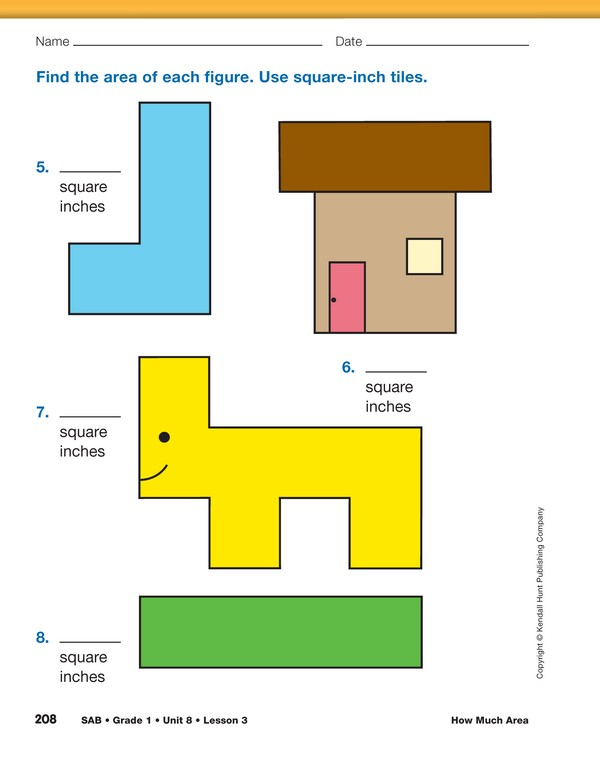
Find the Area with Tiles. Direct students to look at the figures on the Tiles 1 pages in the Student Activity Book.

  • Which shape looks like it is the tallest?
  • Which shape looks the widest?
  • Which figure do you think has the largest area?
  • Which figure looks like it has the smallest area?
  • Do you think that some of the figures may have the same area?

Remind students that the area of a shape is the amount of space needed to cover something. The size is often measured by counting the unit squares that can be placed on top of the shape to cover it.

Have student pairs use the square-inch tiles to cover the shapes on the Tiles 1 pages and record the area.

  • Which shape on this page is the tallest? (Shape 2 and Shape 4 are tallest.)
  • How tall? (3 inches)
  • Which shape is the shortest? (Shapes 1 and 3)
  • How short? (2 inches)
  • What unit are you using to measure area? (square inches)
  • What is the area of this shape?

Responses will vary based on the shape, but remind students to report the measurements using a number and unit. If students are measuring area, the unit is square inches. If students are measuring length, the unit is inches.

  • Why did you say “five square inches” instead of just five inches? (Possible response: I covered it with squares, so it is 5 square inches. If you say five inches you would have measured a line or side, not the inside.)
  • How did you find the area of this shape? (Possible response: I covered the shape with squares and then I counted them.)
  • Did you find any shapes that have the same area? Which ones? (Shapes 3 and 4, Shapes 5 and 8, and Shapes 6 and 7)
  • Do those two shapes that have the same area also have the same shape? (no)
  • So, can two shapes have the same area but not the same shape? (yes)

After students complete the Tiles 1 pages, have them share observations and strategies. Use the Sample Dialog to guide this discussion.

In the following dialog, students share observations and strategies for finding the area of the shapes on the Tiles 1 pages.

Teacher: Did anyone have trouble finding the area of the figures?

Maya: The house was hard. The top part moves over. I didn’t do it right the first time.

Teacher: Yes, the house was a little tricky. The roof has 3 square inches across and the house has only 2 square inches across, so the roof has to be moved over a little so it sits right on top of the house. [Demonstrates on the display with square-inch tiles.]
Did you find any shapes that had the same area?

Kenya: The two bottom ones on the first page are both 5 square inches. I was surprised. They don’t look the same.

Teacher: That’s a good point. They are very different shapes, aren’t they? I also like that you said 5 square inches when you gave your answer. You said both the number of squares and the unit.

Irma: On Number 5, I didn’t even have to put all the squares on. I put three on the top part and then I could tell it was just one more. Three plus one is four. So it is 4 square inches.

Teacher: Very good strategy, Irma. Did anyone use a skip counting strategy?

Ming: I did. It was on Shape 2. I looked at the big rectangle in the shape and counted 2, 4, 6, 8 and saw the one more. The area is 9 square inches.

Teacher: That’s a very nice way of using what we’ve learned before to help us with the work now, Ming.

X
SG_Mini
+
X
SG_Mini
+