|
|
Daily Practice and Problems |
Lesson |
Homework |
Assessment |
Student Books |
Student Activity Book |
|
|
|
|
Teacher Resources |
Teacher Guide - digital |
|
|
|
|
Supplies for Students
pattern block set (4 yellow hexagons, 24 green triangles, 16 brown trapezoids, 12 blue rhombuses,
8 red trapezoids, 5 orange squares, 12 purple triangles, 8 tan rhombuses). See Materials Preparation.
Supplies for Student Pairs
30 straws all the same length. See Materials Preparation.
30 two-inch connectors (made from chenille sticks or paper clips). See Materials Preparation.
6 self-adhesive notes
Materials for the Teacher
Display of What Makes a Shape a Polygon Master (Teacher Guide)
Unit 13 Assessment Record
Display set of pattern blocks (yellow hexagon, green triangle, blue rhombus, red trapezoid, orange square, tan
rhombus)
scissors
3 straws
3 two-inch connectors (made from chenille sticks or paper clips)
Materials Preparation
Gather Straws and Prepare Connectors. Each student pair will need 30 straws and 30 2-inch connectors.
Gather straws of the same length. Cut chenille sticks into 2-inch sections or use bent paper clips as shown in
Figure 3.
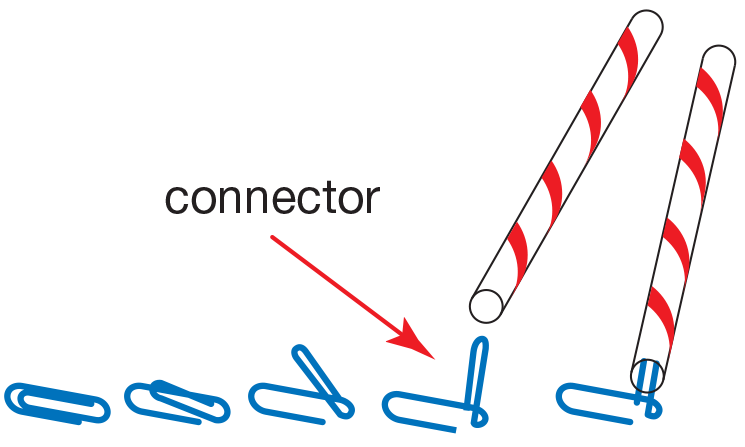
Figure 3: Using a paper clip as a connector
TIMS Tip
If the straws are very long, you may choose to cut them in half. This will make the sizes of the models more manageable.
Prepare Pattern Block Sets. Add pattern blocks to pattern block sets from Lesson 2. Add 5 orange squares,
12 purple triangles, and 8 tan rhombuses to each student's set. This will be the set you will use for the
remainder of the lessons in this unit. Organize pattern blocks into sets and place each set into a resealable
plastic bag.


