Multiplication and Rectangles
Est. Class Sessions: 2–3Developing the Lesson
Part 2. Saying 13 in Japan
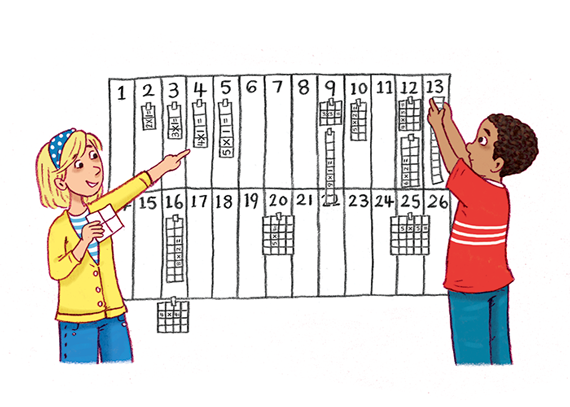
After students have investigated the rectangles for 12 and 18 tiles, assign the numbers from 1–25 to different groups. Working together, groups will use tiles to make all possible rectangles for their numbers, then draw the rectangles on Square-Inch Grid Paper and cut them out as described in Question 4. They will write multiplication sentences on their rectangles and finally, they will mount their rectangles on a class chart (Question 5) as shown in Figure 4.
Assign numbers to the groups so that the more interesting numbers listed below are distributed evenly among the groups.
- prime numbers: 1, 2, 3, 5, 7, 11, 13, 17, 19, 23
- odd numbers that are not prime: 9, 15, 21, 25
- numbers with 3 or more rectangles: 12 (done in class), 16, 18 (done in class), 20, 24
- square numbers 4, 9 (listed above), 16 (listed above), 25 (listed above)
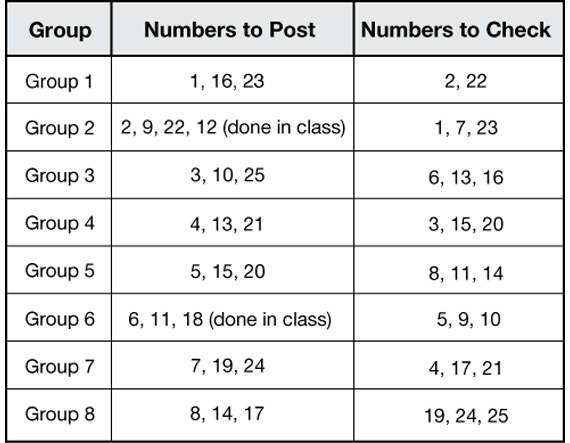
Assign each group some numbers to post and some to check (these will be posted by other groups). For example, if you are working with 8 groups, you might distribute the numbers as shown in Figure 5.
Encourage students to speculate in advance about the rectangles that are possible. One common prediction is that the odd numbers will have only one rectangle each. Students will probably revise their thinking when they build rectangles with 9, 15, 21, or 25 tiles.
Ask students to post their rectangles on a class chart. Make a large chart on paper, putting columns for each number. See Figure 4. Alternatively, use separate sheets of construction paper, with a number written on top of each, and post the sheets (in order) around the room.
Ask students who finish early to find all the rectangles for the numbers 26–29.
Ask students to complete the table on the Rectangles page in the Student Activity Book, as shown in Figure 6 (Question 6 in the Student Guide). Completing this table will help students make a connection between the rectangles and multiplication.


