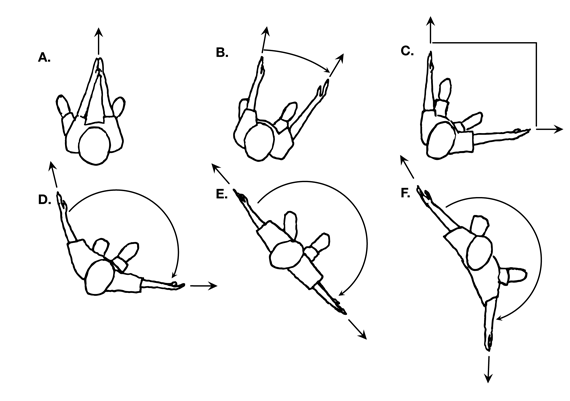
Make Angles with Arms. Begin the lesson by having students physically demonstrate the turning of rays through an angle according to the following steps. See Figure 1.
- Hold both hands together in front of you with arms straight and palms facing each other.
- Move one of your arms slowly away from the other, turning through a small angle. Exaggerate the turning motion to emphasize the turning motion that opens (or closes) the angle. Demonstrate moving through an angle of about 45° and then stopping.
Ask the following questions about this angle while referring to the terms on the Geometry Word Chart as you say them:
- What are the rays of your angle? (Arms are the rays.)
- What is the common endpoint of the rays in your angle? (Responses may include body, head, or shoulders. This point will be formally introduced as the vertex point later in the lesson.)
- About how large is your angle? (Answers will vary. Students may recall that the angle is an acute angle since it has less turning than a right angle.)
- Is it an acute angle, a right angle, or an obtuse angle? (acute)
Ask students to rotate their arms to make acute angles, right angles, and obtuse angles as shown in Figure 1. Note whether students are becoming confident with these classifications. Continue this exercise by asking students to show angles that are larger (and smaller) than the angle you are showing them.
- Are there any other kinds of angles you can show with your arms that are not acute, right, or obtuse angles?
Students may show the following angles:
- Angle with no turning (by holding arms and hands together in front of them)
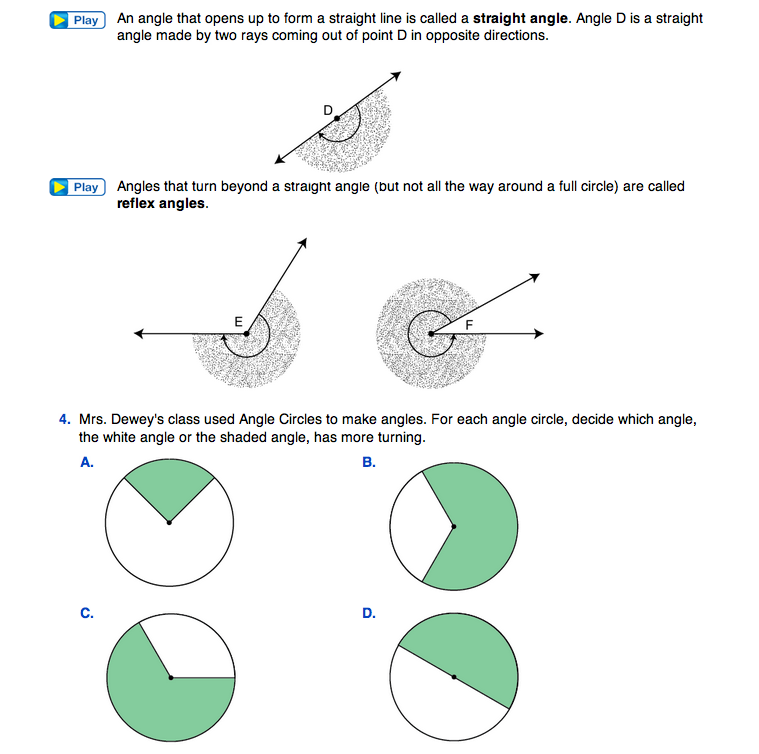
- Straight angle (by pointing arms in opposite directions)
- Reflex angle (by rotating arms beyond a straight angle)
For each of these types of angles students show, ask:
- Is [student name] showing an angle? (Each represents a type of angle. The angle with no turning has two rays that are in exactly the same place. The straight angle has two rays extending in opposite directions from the vertex.)
- What makes it an angle? (two rays pointing out from a vertex)
If no student demonstrates any one of these types of angles, demonstrate it yourself and ask the questions above. Write the words straight angle and reflex angle on the Geometry Word Chart as they come up. Ask students to draw examples of each near the words.
When working with angles, there are several terms that may cause confusion. Here is a list of terms that will be used in this lesson.
- acute angle measures less than 90°
- right angle measures exactly 90°
- obtuse angle measures more than 90° but less than 180°
- straight angle measures exactly 180°
- reflex angle measures more than 180° but less than 360°
Angles are a measure of rotation—therefore, an angle can measure more than 360°. However, in plane geometry, angle measures are generally 360° or less.
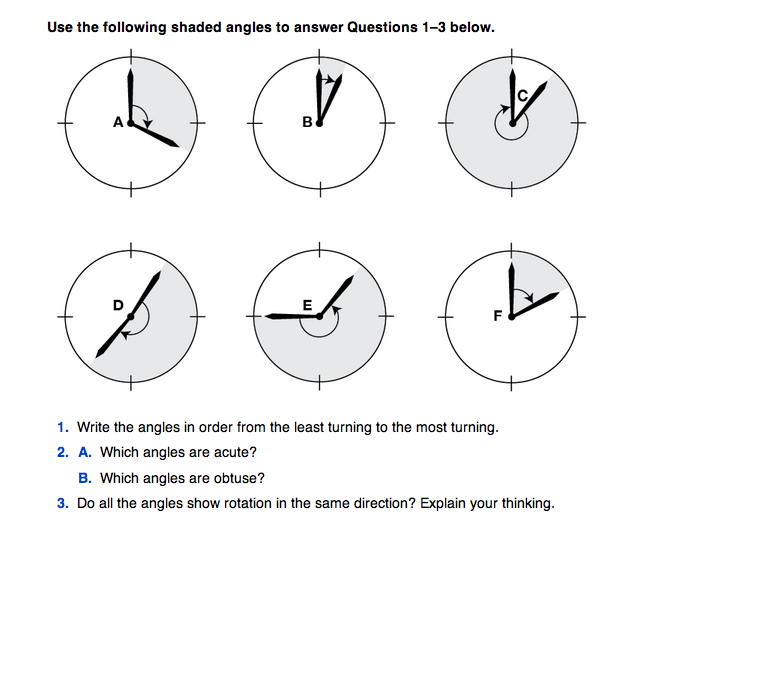
Read the first Turning Through Angles page in the Student Guide with the class. Add the word rotation to the Geometry Word Chart with a representation of its meaning (amount of turning). Working with partners, students answer Questions 1–3 about the angles shown. Have one or two students share their responses with the class.
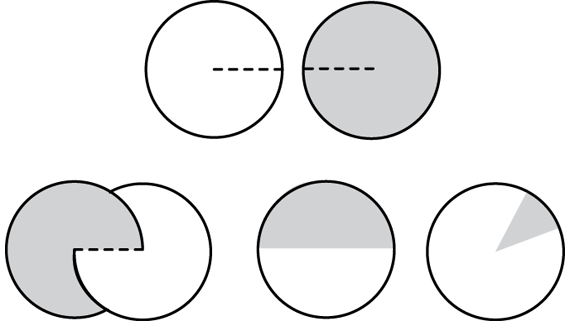
Use Angle Circles. If you have not already cut out the Angle Circles from the Angle Circles Master, have students do so now. Make sure each student has two circles, one cut from colored paper and one from white. Each student should cut a slit along the dashed line (radius) of each circle to the center and fit the two circles together along the slits as shown in Figure 2. They can then rotate the circles to show different-sized angles. Point out to students that the Angle Circles actually show two angles. As one angle gets larger by turning, the other angle decreases in the amount of turning.
Once students have explored their angle circles, ask them to do the following:
- Make a white angle that has more turning than the green angle.
- Make a white angle that has less turning than the green angle.
- Make the shaded angles shown above Question 1 in the Student Guide.
Ask students to complete Questions 4–5 in pairs. Make sure they recognize the two angles that are shown on the Angle Circles: a white and a green angle.
Use Check-In: Question 5 to assess students' abilities to create and identify acute, right, obtuse, straight, and reflex angles [E2]. You may wish to observe students' responses by reading each of the angle descriptions to the whole class and having students hold up their circles after making the angles. Alternatively, you can circulate among student pairs to observe their angles individually.
Targeted practice for Expectation 2 is in the Lesson 6 Workshop. This activity with the Angle Circles can also be used as targeted practice.
Lead a discussion about the relationship of the green angle and the white angle. Allow students to make angles with their Angle Circles as needed.
- If the green angle is a straight angle (half way around the circle), what can you say about the white angle? (also a straight angle)
- If the green angle is obtuse, what kind of angle is the white angle? (a reflex angle)
- If the green angle is right or acute, what kind of angle is the white angle? (a reflex angle)
- What happens to the white angle as the green angle gets larger? (The white angle gets smaller.)
- What happens to the white angle when the green angle turns all the way around the circle? (The white angle disappears; it shows no turning.)
- If you add the green angle and the white angle together, what do you get? (an angle that turns all the way around the circle)
- What is the relationship between the turning of the green angle and the turning of the white angle? (Together they form a full circle.)

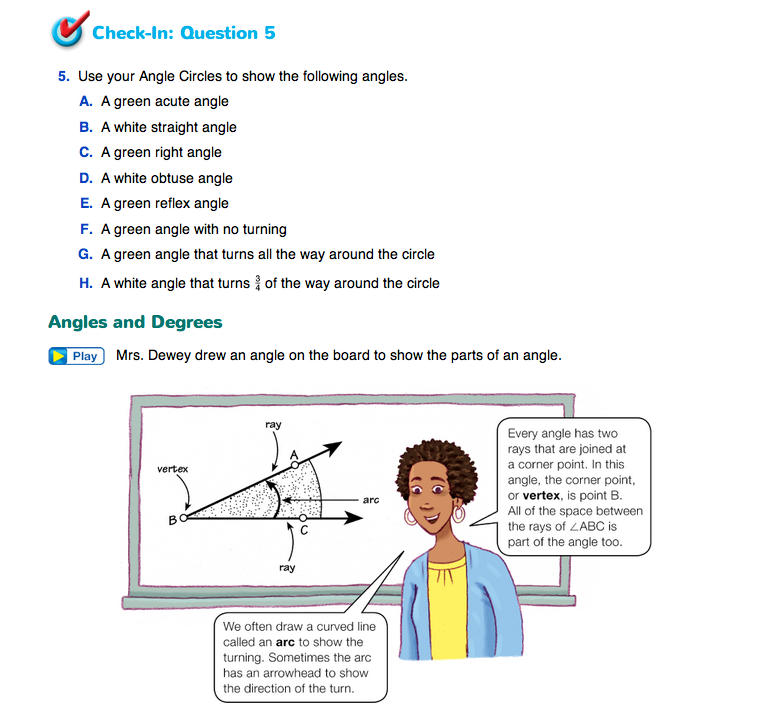
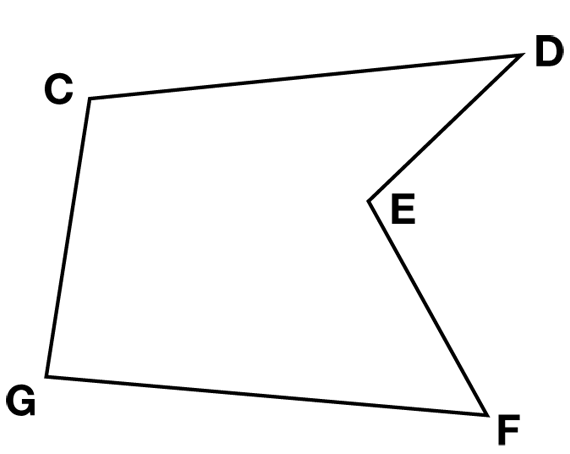
Which Angle Do You Mean? When naming angles such as ∠DEF in Figure 3, there are two angles (really many more) that share the name ∠DEF. In this case, one is an obtuse angle and the other is a reflex angle. If no arc is shown on the angle, it is usually assumed that ∠DEF is the smaller angle of the two angles. One exception is if a reflex angle is inside of a polygon as shown in Figure 4. Then ∠DEF would most likely refer to the reflex angle. In any case, there are two easy ways to avoid confusion.
- Draw an arc to show which angle matches the named angle.
- Write the word “reflex” before the angle name (e.g., reflex ∠DEF) when referring to the angle that is greater than 180°.