Lesson 10

Classifying Shapes

Est. Class Sessions: 2–3

Developing the Lesson

Part 1. Classifying Triangles

Compare Triangles. Begin by asking students to look carefully at Triangles 2 and 6 that they cut out from the Triangle Sort Cards 1 pages in the Student Activity Book.

  • Look at the properties of Triangles 2 and 6. How are the two triangles alike? (Possible responses: They both have two sides that are the same length. They both have one line of symmetry.)
  • How are they different? (One has a right angle and the other has all acute angles [or angles less than 90 degrees].)

Students may note that the size (area) of the two triangles is different. This is true but hard to measure with the tools available. Encourage students to focus on the properties of the triangle (sides, angles, and lines of symmetry).

  • How are Triangles 3 and 7 alike? (They both have obtuse angles [or angles greater than 90 degrees].)
  • How are they different? (Triangle 3 has two equal sides and the sides of Triangle 7 are all different lengths. Triangle 3 has one line of symmetry. Triangle 7 has no lines of symmetry.)

Sort Triangles. Continue by asking students to work with a partner to sort one set of the 14 triangles on the Triangle Sort Cards 1 and 2 pages.

  • Sort the 14 triangles into three groups using properties.
  • Use the list of properties on the Shape Finder class chart or the list of questions about properties in the Student Guide from Lesson 9 to help you.
  • Choose three groups so that no triangle belongs in more than one group.
  • Use the sides and angles of the Power Polygons™ to help you compare the triangles.
  • Be prepared to describe the properties of the triangles in each group.

If any students are overwhelmed by the number of triangles, ask them to start with Triangles 1–7 on the Triangle Sort 1 page and set aside Triangles 8–14 from the second page. All of the combinations of angles and side lengths are within the first seven triangles.

Talk with students as they work. Let students develop their own sorting process as much as possible. Give them time to study the triangles. Encourage them to look for differences and similarities using the sides and angles of the Power Polygons™ to make comparisons. The right angles and sides of the squares will be particularly useful. Focus their attention on the parts of the triangles (angles, sides, and lines of symmetry) that they studied in Lesson 9 as opposed to the size of the whole triangle or its orientation on the page.

If a pair of students has trouble getting started organizing three groups, ask questions similar to those below as necessary. Encourage them to concentrate on one characteristic of triangles such as angle size, side length, or lines of symmetry.

  • Look at the list of properties on the Shape Finder chart. What properties did we use to describe the shapes in Lesson 9? (Number of angles, number of sides, one or more right angles, one or more obtuse angles, equal sides, number of lines of symmetry)
  • Does it make sense to use number of sides or number of angles to sort the triangles? Why or why not? (No, all the triangles have three sides and three angles, so they would all go in one group.)
  • How are the triangles different from one another? (Possible responses: angle size, side length, number of lines of symmetry)
  • What questions can you ask about each triangle? (Are any of the sides equal to one another? How many sides are equal? Are any of the angles right or obtuse? Does the triangle have any lines of symmetry?)
  • Would you rather think about the angles, sides, or lines of symmetry? Choose one for your sort.
  • If you choose to sort by [angle size, side length, or lines of symmetry], what are your three groups?

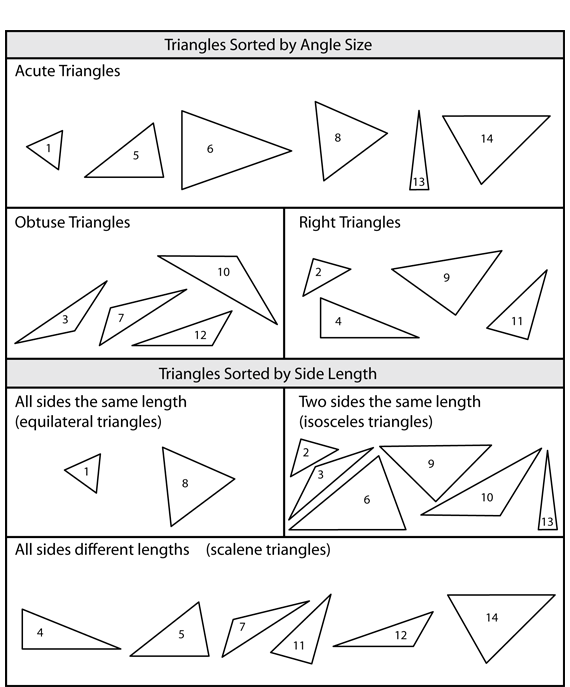
As groups finish sorting the triangles, note how different groups chose to classify them. Two possible classification schemes are shown in Figure 1. Choose a group of students who sorted by angle size and a group that sorted by side length to show the class their groups using displays of the Triangle Sort Cards. Ask them to explain how they chose their groups and made their decisions of which triangles to include in each group. Ask the class to challenge their choices or to ask clarifying questions.

If no group sorted by side length, ask them to work with their partners to answer the questions below and then sort the triangles.

  • How can you sort the triangles based on the length of the sides?
  • What three groups can you use? (You can sort them into triangles that have all sides the same length, 2 sides the same length, or all sides with different lengths.)

Sorting by lines of symmetry. If students choose to sort the triangles by lines of symmetry, the three groups will have the same triangles as those for classifying by side length. The equilateral triangles have three lines of symmetry, the isosceles triangles have one line of symmetry, and the scalene triangles have none.

If the terms equilateral, isosceles, and scalene are named in your state or local standards, add these words to the Geometry Word Chart.

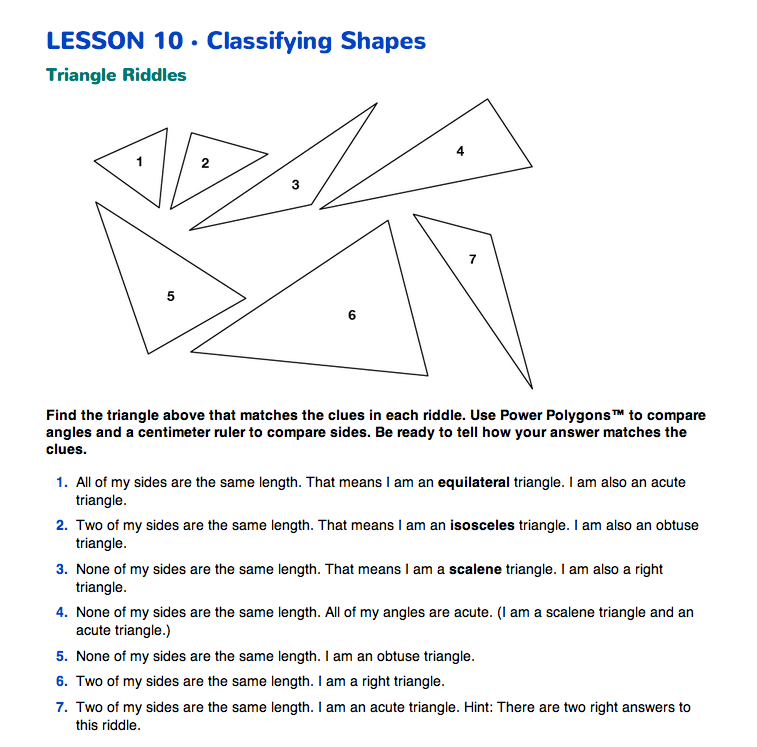
Solve Triangle Riddles. Ask students to look at the seven triangles at the top of the Triangle Riddles section of the Classifying Shapes pages in the Student Guide. Have students work in pairs to answer the riddles in Questions 1–7. Students can use their centimeter ruler to compare the lengths of the sides and the Power Polygons™ to help them decide whether an angle is acute, right, or obtuse. The riddles help students understand that the same triangle can have two different names. This activity introduces the names of triangles that are based on side length: equilateral, isosceles, and scalene. See Figure 1. As students work, ask them to explain how they know their answers to each riddle are correct.

Play Mystery Properties. Tell students they are going to play a new version of the Shape Finder game they played in Lesson 9. Call this game Mystery Properties. Display the Sorting Polygons page from the Student Activity Book.

  • Watch carefully as I place the Triangle Sort Cards, one at a time into two groups of triangles. The triangles in Box A will go inside the solid lines. The triangles in Box B will go inside the dotted lines. (See Figure 2.)
  • All of the triangles in A will have one property. All of the triangles in B will have another property.
  • Some triangles will have both properties. They will go into the middle section where A and B overlap.
  • I will place triangles that have neither property outside both the dotted and solid lines.
  • Your job is to name the two properties. Do not guess out loud. Raise your hand when you think you know both properties. When many hands are up, I will ask one person to write the property for Box A. That person will call on someone else to write the other property in Box B. Both will need to justify their answers.

Begin placing triangles as shown in Figure 2. Do not yet write the property names over Box A and Box B. Use displays of the triangles in the Triangle Sort Cards in the Student Activity Book. The triangles in Box A are right triangles. The triangles in Box B have two sides equal (isosceles triangles).

Discuss the properties students name for each shape. Encourage students to use their own words to describe the properties. The important idea is that shapes can have more than one name based on their properties. Students may say, “Two sides are the same for the triangles in B” and “Has a square corner for A.” During discussion, model using mathematical terms.

  • Do you agree that all the triangles in A are right triangles? How can you tell? (I can use the corner of the orange square to check.)
  • What can you say about the triangles that are in both A and B? (They have right angles and they have two equal sides.)
  • We can use another name for those triangles that are right and have two equal sides. Isosceles means that the triangle has two equal sides, so we can call them isosceles right triangles.

Play additional games. Sample games are shown in Figures 3 and 4. After leading two or three games, ask volunteers to serve as the leader, choose two mystery properties, and place triangles on the board for the class to name.

  • In Figure 3, A has right triangles and B has obtuse triangles. Note that the overlapping section of A and B is empty.
  • In Figure 4, A has equilateral triangles and B has triangles with at least two equal sides (isosceles triangles). Note that all equilateral triangles are also isosceles triangles, since a triangle with three equal sides will also have two equal sides.
X
SG_Mini
+
X
SG_Mini
+
X
SG_Mini
+
Sorting triangles by angle size and side length
X
+
A board for playing Mystery Properties using right triangles and isosceles triangles from the Triangle Sort Cards 1 and 2 pages
X
+
A board for playing Mystery Properties using right triangles and obtuse triangles
X
+
A board for playing Mystery Properties using equilateral triangles and isosceles triangles
X
+